Wednesday, April 11, 2012

Sketch to Reality...


I often like to sketch my ideas before I create them....while they most often take a u-turn and end up looking totally different than their original inspiration, it's nice to have a jumping off point.  I usually let the textiles, and Vintage items I find direct the project; and organically it ends up something much more exciting than I could have ever put on paper.
With that being said....sometimes it comes out, exactly as I planned...with this headpiece for example.  My vision was to have it nestled amongst a pile of crazy curls, in an abstract design, but the piece turned out just as I had designed.  Light and airy, with height and depth.  Each petal has been subtly hand painted and layered.  The front embroidery piece, was also painted, beaded and embroidered...lined with a sheer tulle, and shaped for fit.  Each leaf was painted, shaped and placed for beautiful effect.  The beaded strands make it romantic and whimsical...and have also been painted for added depth.  I call it "El Jaleo" after the John Singer Sargent painting.  It reminds me of a Spanish dancer....and model Aimee portrays it here to perfection.  Not sure if this is for everyone...but an adventurous bride, a masquerade ball...or even an English Tea might suit this piece perfectly. 
xo,
Erin 

 * photo compliments of Enchanted Images


Tuesday, April 10, 2012

Clearing the Decks...

I've been gone a while, and while I can't say this is brilliant way to return...I can say it is a good reason to!  I am having a sale on a section of hair accessories in my shop, and it's the first time I've done a sale on just a section of items.  Time to clear out my hair accessories section, because I have so many new ideas bursting out of my head!  I need to make some room for new things to happen!

If you haven't checked out my shop for a while, there are a lot of new items there...so take a look.  Always one of a kind, and always made with a loving hand!
Cheers,
Erin

www.WrappedInClover.etsy.com


*photos compliments of Enchanted Images

Monday, November 14, 2011

Hang Up Your Stocking!!!

They're done!!!  I can officially add Costume Designer to my list of things I can call myself.  Holy Cow this was a big undertaking...now lets hope the darn things fit!!!  The whole time I was making these I kept imagining my three year old wagging her finger at me singing "Hang Up Your Stocking"!!!  It's enough to keep going:)  

Here she is... have you ever watched a three year old try to tap?  Pretty funny...she's the one with the bobbed hair.  


Here are the costumes...

 and the close up's...


Tuesday, November 8, 2011

Holiday Giveaway 2011

 Wrapped In Clover Giveaway, Holiday 2011!! 

This is my first official giveaway, so I hope you will all enter and pass along to others!!!!
*How to enter:
1. Comment on my facebook posting about this giveaway (that way I have your name)
2. Recommend my facebook page or my shop on your wall

Winner will be drawn and announced on November 30th

"Raven Flora" - necklace and earring set


Inspirational Quote...


This saying resonated with me...had to share.  
-E

Tuesday, November 1, 2011

Buried...

Sorry for my long absence here, but somehow...like always, I have gotten BURIED this time of year with projects.  I am always busy during the Holidays, filling custom orders and keeping up with my kids schedules...but this year takes the cake.  Somehow, I ended up taking on some BIG costume projects for my Daughters dance studio.  While usually I would love this project...this time of year has left me with no free time to myself...and creatively a little tapped out.  Combine this with custom Halloween costumes for my girls, multiple large Wrapped In Clover orders, a 90th Birthday party for my Grammy...and life with a 3 and 6 year old... cross your fingers for me that I'll emerge unscathed from this season.

For now, I'll be sewing.


Costumes in the works...I've exploded onto my dining room table.  


Wednesday, September 21, 2011

Another beautiful Wedding!

This picture just came to me compliments of Heather.  I was commissioned to make all matching necklaces for her bridesmaids in her recent wedding.  Heather is the GORGEOUS bride in the middle....of course:)  The trick was... they were to be made from Vintage pieces...which is usually a tough call to find multiples of matching vintage pieces, however I found a supplier of "new old stock" (old necklaces that never sold...truly vintage, in mass quantity) and bought them all!!!  So Heather was able to get a bunch of matching necklaces, with the vintage component...cool!  The colors were super cute too...Yellow, White, and black and white polka dots.  Thanks Heather...Enjoy the photo!

Monday, August 15, 2011

Beautiful Bride Brandi

About a year ago I was hit with multiple orders for one necklace bib that had been featured on etsy.  I normally don't make multiples of an item, but in this case, I was able to do so, while upholding my standard that each item is one of a kind.  Every item that went out was similar in look, but uniquely different in the Vintage items it featured and the color combinations that were used.

One particular order was from a "Bride-to-be" named Brandi, who requested a Spring Bouquet bib necklace in all "Greens".  It was my favorite one that I made.  Brandi recently shared a picture of herself in her wedding gown with the necklace on.  I am proud that she chose to wear a Wrapped In Clover piece on her special day.

Thanks Brandi!


Monday, August 8, 2011

Diamond Tufted headboard

This is a tutorial I read and altered a bit about how to make a diamond tufted headboard.  I highly recommend it!
Please read in conjunction with my suggestions.
http://blog.addicted2decorating.com/2010/08/how-to-make-diamond-tufted-upholstered.html

My suggestions:
Step 1:  Decide on a shape/size for your wood cut out.  I drafted mine in cardboard so I could hold it up by the bed to assure size and scale.
Step 2:  Plywood...or any other straight wide wood works well.  Jigsaw out the shape.  Sand edges smooth.
Step 3: Spray the wood and foam with foam glue (make sure it wont eat the foam).
Step 4:  Cut the foam in the shape of the headboard.
Step 5: Mark the places for the buttons and drill right through the foam through the wood.  Or maybe from the back if it's thick foam.
Step 6:  Using pincher fingers or a door hole drill bit, enlarge each button hole tapering down to a point, and round the foam edges.
Step 7: Cover the foam with spray glue and batting, pressing down into each button hold divot and around edges.
Step 8:  The fabric laid out should allow for a lot of extra space on each side...three feet or more preferred.  Place the center of the fabric in the center of the headboard.  Begin tufting...
(look at the guide I used to do the remainder of the tufting)

Make sure you don't pull the fabric too tight.  Pull each button (in the order suggested on the tutorial) on a large needle with waxed upholstery string through the fabric, tufting, foam and wood hole, and secure on the back of the wood with staples.   My one word of advice...follow the directions on the tutorial about how to tuft EXACTLY.  Button tuft the headboard before you finish off the edges.  Make sure you place the fabric with TONZ of room all the way around, the tufting eats up excess fabric, and you may find yourself with not enough to finish it off with.

The set up is the most important part...that's why I spelled it out here...but the guide I used works great!
Finishing it off can be done with store bought or handmade piping, nail heads, or left just plain...

Here is the one I made for my daughter Maggie!
Happy Tufting!


Thursday, July 28, 2011

Repurposing- A Store bought Women's Shirt into a custom Girl's Dress

When I purchase something...I almost always alter it.  


I buy a frame, I repaint it.  I buy jewelry, I add to it.  I buy a toss pillow, and I add trimming to it.  Not much in my home has passed through my hands without being altered.


With that in mind, I began looking for Vintage style dresses for my girls.


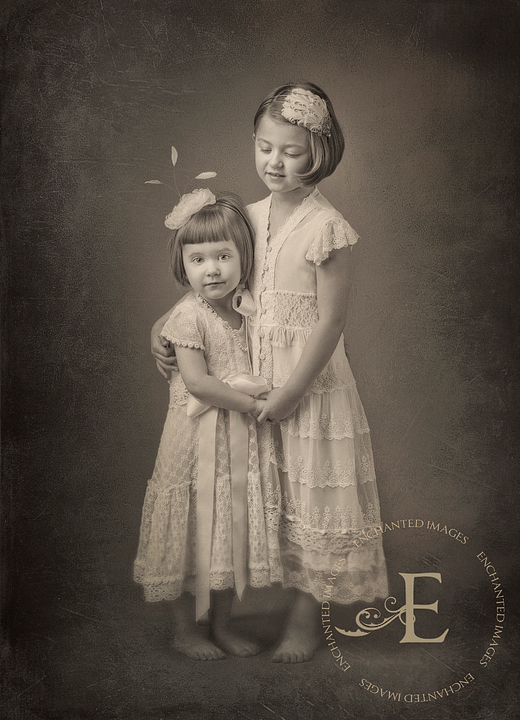
To make a long story short, I was having a photo session of them shot for my Husband for our 12 year Wedding Anniversary.  The photo was being done by Enchanted Images (which will receive it's own post as a featured artist on a later date)  and the idea was to have it be very Vintage looking.  I got their hair cut, I made Vintage looking headbands...but had no luck with finding the dresses.  On one particular shopping hunt at TJ Maxx, I happened on a Women's clothing round rack of all lace tunics and knew I had something to work with.  Some of the long ones even looked like they could be girls dresses....um, sort of.  Maybe if I squinted and turned my head at just the right angle...


I digress.

Knowing I possessed basic garment constructing skills, I decided to try my hand at repurposing these pieces.  Here they are before alteration...


I pat myself on the back here :)  This is a brilliant idea...because fabric and trimmings can be so very expensive...and for two shirts at $20.00 each, and some store bought trimmings and ribbon, I was able to create some "one of a kind" dresses that looked beautiful and suited the picture to a "T".  I had to make some basic liners because the dresses were very transparent.  Arm holes had to be re cut, side seams re-sewn, panels added for length...but all in all...not too difficult, and I got the result I desired.
So next time you are looking for a sewing project, if you have basic garment constructing skills....and a little model to fit on...try repurposing women's clothing!


Here they are in a beautiful Enchanted Images portrait after!!  My girls are pretty cute too I would say:)


Thank you Enchanted Images for the use of your beautiful photos!

Wednesday, July 13, 2011

Frolicking Feathers...something new


So I found these curled and dyed goose feather pads, and I am nuts about them.  Combined with my hoards of Vintage Brooches-  put them on headbands and voila..."Vintage Plumes"
I know it's not the most original thing I've ever made, but I'm trying to replicate things I've seen in old photographs from the 20's with a bit of a modern twist.  They are so cute on too...enjoy!


Tuesday, July 5, 2011

Featured Artist: Jennifer Morris

Meet Jennifer Morris, of Jennifer Morris Beads and Jewelry www.JenniferMorrisBeads.etsy.com

Not too often am I gob smacked by someone’s talent and creations like I have been by this artist.  I found Jennifer on etsy while perusing the shops, and have been a fan ever since.  As a person, Jennifer is friendly, giving, sweet, kind, encouraging, and very generous with her time.  We have struck up a bit of a friendship, exchanging stories and current life happenings, and I am always amazed at the sweet way she converses with me…as if we have been friends our whole lives.  I am lucky to say I own a few of her pieces…each I treasure and wear proudly.  When you purchase a Jennifer Morris piece, it arrives beautifully wrapped with a hand written card.  Just like you've sent yourself a special gift!  Someday I hope to meet her in person, but until then…please give a round of applause to Miss Jennifer Morris!

Here is her self written bio:

Jennifer Morris has been making things forever, exploring the world with an overactive imagination and very busy hands.  Jennifer is an experienced wood worker, welder, photographer, yogini and chef. She dreams of playing the ukulele and being able to carry a tune. Maybe someday..

When she's not working in her studio, you can find Jennifer  humming, steeping, sipping, staring, gazing, glimpsing, braising, sautéing, fonduing, sledding, pedaling, skating, skipping, jumping, reaching, climbing, dreaming, digging, plucking, strumming, snapping, cutting, folding, stitching, sketching, gluing, bending, stretching, pouring, swallowing, planting, watching, listening, looking,
and most always with one of her cameras.


All of the decorative beads are made by Jennifer with her own ever-changing blend of polymer clay infused with gold and silver leaf and often times paper clay mixed from recycled paper and fiber.  All of the beads are free form, made without molds... each dot, loop, swirl is placed on one at a time then carved and shaped.  
All rhinestones and components are vintage and recycled from old jewelry.
The gems from guaranteed humane sources.  All wire is 14k gold, sterling silver and vermeil.

Here is a sampling of her work…  enjoy!